FEASTS AND FOTOS

  • Home
  • About
  • Happenings
  • Contact
You are here: Home / Archives for Salads

Kale and Brussel Sprout Salad

April 28, 2014 by Susan

KaleSaladR

This past winter was a long one.  Spring is finally here, everything is in bloom and the warm weather is rejuvenating.  I was happy to put away the winter jacket and gloves and rediscover my warmer weather clothes.  But as we know, with warm weather comes lighter, more revealing clothes.  And so comes the mild panic…soon we will all be in bathing suits!

In an effort to lighten up our meals around here I have been whipping up this ‘salad’.  I typically don’t make salads.  I really like them, but I find in order to make a good one you need alot of ingredients and it becomes alot of work.  And I hate washing and drying all the leaves.  That’s why this salad is perfect for me.  Very little washing and drying.  It is quick and super simple.  The only skill you need is to safely slice the kale leaves and sprouts super thin.  (They really need to be so very thin, so take your time with it).  Hopefully eating more of this healthy salad will help me feel a bit less panicked about getting into a swimsuit in a few weeks.

I usually make enough to have some leftovers, this holds up nicely for a day or two in the fridge.  I like to add it to a chicken or steak wrap I make for lunch the next day.

The lemon mustard dressing is a very thick one and gives this salad a great punch.  I don’t use alot of it on here, just enough to coat everything.  If you want it thinner just add some more olive oil.

Here’s what you will need to serve 2-3 people as a side dish…

Recipe

7-8 large brussel sprouts, trimmed, outer leaves discarded, sliced paper-thin

1 shallot, minced

1/2 small clove garlic, grated

2 tbsp lemon juice

1 tbsp Dijon mustard

1 tsp extra virgin olive oil

1/3 cup sliced almonds, toasted

Method

In a small non stick skillet over low heat lightly toast sliced almonds.  Set aside.

Tear kale leaves from the center rib, discard rib. Stack leaves on top of one another, roll them up and slice very thin.  Separate leaves with your fingers and put in a medium bowl.

Trim ends off brussel sprouts and discard outer leaves.  Slice paper-thin.  I usually cut the sprout in half lengthwise, then slice each half widthwise.  Separate with your fingers and add to the bowl of kale.

In a separate bowl mix together the shallot, garlic, olive oil, lemon juice and Dijon mustard. (It will be thick).

Five minutes before serving add the dressing to the kale and sprouts and mix really well.  Lastly, add the sliced almonds and mix gently just until evenly distributed.

Recipe adapted from various sources.

Kale and Brussel Sprout Salad
 
Print
Author: Feasts And Fotos
Ingredients
  • 7-8 large brussel sprouts, trimmed, outer leaves discarded, sliced paper-thin
  • 1 shallot, minced
  • ½ small clove garlic, grated
  • 2 tbsp lemon juice
  • 1 tbsp Dijon mustard
  • 1 tsp extra virgin olive oil
  • ⅓ cup sliced almonds, toasted
Method
  1. In a small non stick skillet over low heat lightly toast sliced almonds.  Set aside.
  2. Tear kale leaves from the center rib, discard rib. Stack leaves on top of one another, roll them up and slice very thin.  Separate leaves with your fingers and put in a medium bowl.
  3. Trim ends off brussel sprouts and discard outer leaves.  Slice paper-thin.  I usually cut the sprout in half lengthwise, then slice each half widthwise.  Separate with your fingers and add to the bowl of kale.
  4. In a separate bowl mix together the shallot, garlic, olive oil, lemon juice and Dijon mustard. (It will be thick).
  5. Five minutes before serving add the dressing to the kale and sprouts and mix really well. Lastly, add the sliced almonds and mix gently just until evenly distributed.
3.2.2802

Filed Under: Salads Tagged With: almonds, brussel sprouts, healthy, kale, salad, vegetarian

Zucchini Salad

September 23, 2010 by Susan


Isn’t this pretty?  Considering we eat with our eyes first, this is a very good start.

The follow up…the flavor, does not disappoint.  It’s bright and refreshing making it a wonderful first course in the warmer months or a perfect side dish with something more hearty, like a steak.

One of the many reasons I love this salad is because, although I call it a salad, there are no leaves to be found!  So, it’s different from the norm and lord knows it’s important to keep things changing from one night to the next.  Another reason I love it – it’s so simple to make.  And I love simple, especially when it’s warm out.  There are just a few ingredients involved and you do not need to use a heat element.  Everything is raw.

You will, however, need a mandolin.  The key to this salad is to make the slices of zucchini paper-thin.  I suppose you could try slicing the zucchini by hand, but I’m sure that could make a person nuts.  Using a mandolin is quick and easy…just be careful of your fingers.  You don’t want to slice anything important off.

Here’s what you will need to serve 2 people…

Recipe

1 large zucchini

1 small leek, white and light green part only, sliced into paper-thin rounds

4-5 tbsp ricotta

1/2 lemon, juiced

1-2 tbsp extra virgin olive oil

1 tbsp parsley, finely chopped

1 tbsp dill, finely chopped

salt & pepper, to taste

Method

First, slice the leek into paper-thin rounds.  Put the rounds in a bowl filled with water, swish them around a bit and then let the leeks soak for a few minutes, allowing all the sand and dirt to fall to the bottom of the bowl.  Gently pull out the leeks, being careful not to stir up the dirt on the bottom.  Give them a final rinse and place on paper towels to dry.

Next, get out that mandolin and start slicing the zucchini into paper-thin rounds.  It helps to make a very straight first cut with the knife when you cut the stem off.  Place all the zucchini in an overlapping pattern on a pretty platter.

Sprinkle the zucchini rounds with the lemon juice, olive oil, salt & pepper.  Place a piece of plastic wrap over it and put in the fridge for at least 15 minutes.  I usually let mine sit for about 30 minutes, or until dinner is ready.

Just before serving, sprinkle the leeks over the zucchini, putting on as many or as little as you prefer.  Next, scatter around small dollops of ricotta cheese all over the zucchini, again using as much or as little as you like.  Finally, sprinkle the parsley and dill over the entire plate.  I also give it a final spritz of lemon juice just before serving.

Recipe adapted from Tyler Florence’s Zucchini Carpaccio


Zucchini Salad
 
Print
Author: Feasts And Fotos
Ingredients
  • 1 large zucchini
  • 1 small leek, white and light green part only, sliced into paper-thin rounds
  • 4-5 tbsp ricotta
  • ½ lemon, juiced
  • 1-2 tbsp extra virgin olive oil
  • 1 tbsp parsley, finely chopped
  • 1 tbsp dill, finely chopped
  • salt & pepper, to taste
Method
  1. First, slice the leek into paper-thin rounds.  Put the rounds in a bowl filled with water, swish them around a bit and then let the leeks soak for a few minutes, allowing all the sand and dirt to fall to the bottom of the bowl.  Gently pull out the leeks, being careful not to stir up the dirt on the bottom.  Give them a final rinse and place on paper towels to dry.
  2. Next, get out that mandolin and start slicing the zucchini into paper-thin rounds.  It helps to make a very straight first cut with the knife when you cut the stem off.  Place all the zucchini in an overlapping pattern on a pretty platter.
  3. Sprinkle the zucchini rounds with the lemon juice, olive oil, salt & pepper.  Place a piece of plastic wrap over it and put in the fridge for at least 15 minutes.  I usually let mine sit for about 30 minutes, or until dinner is ready.
  4. Just before serving, sprinkle the leeks over the zucchini, putting on as many or as little as you prefer.  Next, scatter around small dollops of ricotta cheese all over the zucchini, again using as much or as little as you like.  Finally, sprinkle the parsley and dill over the entire plate.  I also give it a final spritz of lemon juice just before serving.
3.2.2802

Filed Under: Salads Tagged With: healthy, leek, raw, ricotta, salad, side dish, vegetarian, zucchini

String Bean and Tomato Salad

August 11, 2010 by Susan


This is turning into one of my favorite side dishes for the summer.  It’s delicious and for sure that is the most important factor in deciding whether a dish will make an appearance again in our house.  Who wants to spend time making something that’s just….blah?  Before discovering this salad I have to say that I rarely, if ever, made string beans.  They were the forgotten vegetable over here!  I can’t begin to tell you why, I just never made them.  But all that has changed now.

Another two factors determining if I repeat a dish…ease in preparation and how long leftovers last.  This recipe excels in those two areas.  I mean….EASY.  These little string beans do require a bit of work (cutting off the ends and steaming), however, that’s about the only work you will be doing, other than some light chopping.  And they last a long time in the fridge!  Honestly, I forgot about a tiny bit I had leftover in the back of my fridge (for like 5 days) and decided to risk my life and eat it (it smelled fine!) and lo and behold, I’m still here to write about it.  It was still good!

You know what else I love about this recipe?  It’s just different.  Well, for my kitchen, at least.  As I mentioned, I don’t make string beans, ever, so it’s a lovely change.  Also, there’s an herb in here that I hardly use – tarragon.  It adds a very nice little ‘something’ to this salad.

This healthy salad  is a perfect side dish that I love serving with grilled chicken breasts or even fish.  We are trying to cut back on our red meat intake, but I can just imagine this salad going so well with a thick, juicy steak.  Yummy!

Here’s what you will need to serve 4-6 as a side dish…

Recipe

1.5 lbs string beans, stem ends cut

1.5 pints grape tomatoes, halved

1/4 cup extra virgin olive oil

1 large shallot, very finely chopped

1 tbsp tarragon, finely chopped

1 tbsp parsley, finely chopped

salt & pepper to taste

Kalamata olives (optional)

Method

Steam string beans until just tender, approximately 10 minutes.  Beans should still have a crunch to them, you don’t want to overcook and have them mushy.  Remove beans from steamer and allow to cool on a sheet pan.  Once they are cool enough to handle, remove excess water with a paper towel.  Place beans in a large bowl.  Add the tomatoes (and olives if you decide to use them).

Meanwhile, in a small bowl whisk the olive oil with the shallots, tarragon, parsley and some salt and pepper.  Add the dressing to the bean mixture and toss well.  Transfer to a platter and serve.

Salad lasts several days in the fridge, just allow it to come to room temperature before serving.  This will allow the dressing to loosen.

Recipe adapted from Food & Wine Magazine.


String Bean and Tomato Salad
 
Print
Author: Feasts And Fotos
Ingredients
  • 1.5 lbs string beans, stem ends cut
  • 1.5 pints grape tomatoes, halved
  • ¼ cup extra virgin olive oil
  • 1 large shallot, very finely chopped
  • 1 tbsp tarragon, finely chopped
  • 1 tbsp parsley, finely chopped
  • salt & pepper to taste
  • Kalamata olives (optional)
Method
  1. Steam string beans until just tender, approximately 10 minutes. Beans should still have a crunch to them, you don't want to overcook and have them mushy. Remove beans from steamer and allow to cool on a sheet pan. Once they are cool enough to handle, remove excess water with a paper towel. Place beans in a large bowl. Add the tomatoes (and olives if you decide to use them).
  2. Meanwhile, in a small bowl whisk the olive oil with the shallots, tarragon, parsley and some salt and pepper. Add the dressing to the bean mixture and toss well. Transfer to a platter and serve.
  3. Salad lasts several days in the fridge, just allow it to come to room temperature before serving. This will allow the dressing to loosen.
3.2.2802

Filed Under: Salads Tagged With: gluten free, green bean, healthy, salad, side dish, stringbean, tarragon, tomato, vegetarian

Marinated Cauliflower

June 15, 2010 by Susan

I am back from my honeymoon in Hawaii and just barely coming out of the depression over not being in Hawaii anymore.  That place is paradise.  Two weeks in paradise makes getting back to reality quite a challenge.  No big surprise, cooking has not been at the forefront of my mind.  Two weeks of having all my meals served to me (sometimes in a fluffy bathrobe!) was glorious.  Glorious!  But alas, my reality includes getting back to cooking…

So, something quick and easy was in order.  To ease the shock of not stumbling past roughly four gorgeous natural waterfalls per day.  (Not having an easy time with the ‘get back to reality’ concept.)  Anyway, this marinated cauliflower recipe is just that, quick and easy.  It’s also super delicious.  It’s a wonderful side dish for just about anything and is served at room temperature (or slightly chilled) making it a wonderful option for an outdoor BBQ.

This recipe is best if left to marinate overnight, allowing the cauliflower to soak up all the yummy vinaigrette.  It just gets better the longer it sits.

Here’s what you will need to serve 4-6 people…

Recipe

1 very large head of cauliflower (or 2 medium), broken up into bite sized florets

1/4 cup chopped shallots

2 tablespoons capers, drained

3 tablespoons chopped parsley

1/4 cup white wine vinegar

1 teaspoon Dijon mustard

1/2 cup extra virgin olive oil

salt & pepper to taste

Method

Steam cauliflower until just tender.  You want the cauliflower to still have a bite to it, so don’t overcook.   Transfer to a large bowl.

Whisk together vinegar, shallots and mustard in a small bowl.  Add some salt and pepper.  Pour in the oil in a slow, steady stream, whisking constantly.  Pour vinaigrette over warm cauliflower.  Add the capers and parsley.  Stir to combine.

Cover and refrigerate overnight.  Serve chilled or at room temperature.

This recipe is adapted from Martha Stewart.

Marinated Cauliflower
 
Print
Author: Feasts And Fotos
Ingredients
  • 1 very large head of cauliflower (or 2 medium), broken up into bite sized florets
  • ¼ cup chopped shallots
  • 2 tablespoons capers, drained
  • 3 tablespoons chopped parsley
  • ¼ cup white wine vinegar
  • 1 teaspoon Dijon mustard
  • ½ cup extra virgin olive oil
  • salt & pepper to taste
Method
  1. Steam cauliflower until just tender.  You want the cauliflower to still have a bite to it, so don't overcook.   Transfer to a large bowl.
  2. Whisk together vinegar, shallots and mustard in a small bowl.  Add some salt and pepper.  Pour in the oil in a slow, steady stream, whisking constantly.  Pour vinaigrette over warm cauliflower.  Add the capers and parsley.  Stir to combine.
  3. Cover and refrigerate overnight.  Serve chilled or at room temperature.
3.2.2802

Filed Under: Salads, Sides and Sauces Tagged With: cauliflower, healthy, side dish

Cauliflower Zahlouk

February 10, 2010 by Susan

Cauliflower Zahlouk Above

I have seriously been under using cauliflower.  To be honest, I used to find it quite boring and uninspiring.   Boiled.  Bland.  Yuck.  But all that has changed.  I’ve forced myself to use the vegetable more and have stumbled upon some wonderful recipes.  This particular one is outstanding.  Typically zahlouk, a chopped or mashed salad, is made with eggplant.  However, you can substitute any vegetable.

There are so many flavors and textures going on in this dish – it’s actually exciting to eat it!  And you hardly remember you are eating what used to be boring, bland cauliflower.  The charmoula dressing (a typical Moroccan sauce) really brings the ingredients alive.  I have made this repeatedly over the past few months, using it as a side dish with grilled chicken, baked fish and even a steak.  It goes with everything or can be eaten alone as a vegetarian dish.  Also, it lasts for up to 4-5 days in the fridge!

I adapted this recipe from the cookbook Mediterranean Fresh.  Fabulous book with many excellent recipes.  I’m working my way through some dishes that have caught my eye and will most certainly post another one shortly.

In the meantime give this recipe a try, you will be amazed at how delicious cauliflower can be.

Here’s what  you will need to serve 4-6 as a side dish…

Recipe

1 large cauliflower (largest you can find), cut into small florets

4 cloves garlic, whole

1 strip fresh lemon peel

1/8 lb green beans (I use a fist full of haricot verts), cut into 1/2 inch dice

3/4 cup chickpeas, drained and rinsed

2 Tbsp oil cured black olives, roughly chopped

3/4 cup – 1 cup charmoula dressing, thinned with lemon juice

Charmoula Dressing (makes 1 cup)

1/8 cup lemon juice, plus 1 Tbsp

1/8 cup red wine vinegar

3 cloves garlic, finely minced

1 tsp paprika

1 tsp ground cumin

1/8 tsp cayenne

3 Tbsp chopped parsley

3 Tbsp chopped cilantro

1/2 cup olive oil, plus some extra if needed

salt & pepper

Method

Place the cauliflower florets, whole garlic cloves and lemon peel in a steamer and steam until just tender (not too mushy), about 6-7 minutes.  Remove from pan.  Add green beans to steamer and cook until just tender (still having a slight crunch).

While the cauliflower is steaming, prepare the dressing by mixing the lemon juice, red wine vinegar, garlic, paprika, cumin, cayenne, salt & pepper in a bowl.  Stir in the parsley, cilantro and olive oil. Set aside.

Place the cauliflower and garlic cloves in a large bowl and mash coarsely.  I still like for many of the florets to stay intact, so be gentle.  Add the green beans and stir in most of the charmoula dressing.  (I say “most” because you really don’t want this to swim in the dressing and that really hinges on how large the cauliflower is, which will differ from one person to the next.)  Gently fold in the chick peas and olives.

Dressing should lightly coat all the ingredients.  If you feel you need a touch more dressing, add it.  You can also add more olive oil if needed as well.

 
Cauliflower Zahlouk
 
Print
Author: Feasts And Fotos
Ingredients
  • ⅛ lb green beans (I use a fist full of haricot verts), cut into ½ inch dice
  • ¾ cup chickpeas, drained and rinsed
  • 2 Tbsp oil cured black olives, roughly chopped
  • ¾ cup - 1 cup charmoula dressing, thinned with lemon juice
  • Charmoula Dressing (makes 1 cup)
  • ⅛ cup lemon juice, plus 1 Tbsp
  • ⅛ cup red wine vinegar
  • 3 cloves garlic, finely minced
  • 1 tsp paprika
  • 1 tsp ground cumin
  • ⅛ tsp cayenne
  • 3 Tbsp chopped parsley
  • 3 Tbsp chopped cilantro
  • ½ cup olive oil, plus some extra if needed
  • salt & pepper
Method
  1. Place the cauliflower florets, whole garlic cloves and lemon peel in a steamer and steam until just tender (not too mushy), about 6-7 minutes.  Remove from pan.  Add green beans to steamer and cook until just tender (still having a slight crunch).
  2. While the cauliflower is steaming, prepare the dressing by mixing the lemon juice, red wine vinegar, garlic, paprika, cumin, cayenne, salt & pepper in a bowl.  Stir in the parsley, cilantro and olive oil. Set aside.
  3. Place the cauliflower and garlic cloves in a large bowl and mash coarsely.  I still like for many of the florets to stay intact, so be gentle.  Add the green beans and stir in most of the charmoula dressing.  (I say "most" because you really don't want this to swim in the dressing and that really hinges on how large the cauliflower is, which will differ from one person to the next.)  Gently fold in the chick peas and olives.
  4. Dressing should lightly coat all the ingredients.  If you feel you need a touch more dressing, add it.  You can also add more olive oil if needed as well.
3.2.2802

Filed Under: Salads, Sides and Sauces Tagged With: cauliflower, healthy, side dish, vegetables, vegetarian, zahlouk

Tuna Salad Roll

September 16, 2009 by Susan

TunaRollFixResize

I have been making this delicious fresh tuna salad for a few years now and it just occured to me to put it into a hot dog bun.  I got the idea from lobster rolls, abundant during the summer months.  Both lobster and tuna are somewhat pricey but the tuna is easier and quicker to cook.  You don’t have to concern yourself with taking the lobster meat out of the shells.

This tuna roll is terrific as a light dinner on a hot summer evening.  You only need to stand over a flame for 2 minutes, the rest comes together quite easily.  It is also great for lunch.  If you don’t want to put it in a hot dog bun it is wonderful placed on a bed of greens.

Recipe

1 pound sushi grade tuna steak, cut one inch thick

2 tbsp olive oil, plus extra for brushing

1 large lime, zested and juiced

1 tsp wasabi powder

1 tsp soy sauce

1 tsp toasted seasame oil

5 dashes tobasco sauce

1 ripe Haas avocado

1/4 cup minced scallions

2 tbsp red onion, finely chopped

Salt & pepper

Spinach leaves

Hot dog buns (top slit), lightly toasted

Method

Brush steaks with olive oil and sprinkle with salt & pepper.  Place tuna steak in a very hot saute pan (or grill pan) and cook for only one minute on each side.  The center of the steaks should still be raw.  Set aside on a platter to cool.

In a small bowl, combine the olive oil, lime zest, wasabi, lime juice, soy sauce and hot sauce along with a dash of salt & pepper.  Add the avocados to the vinaigrette and toss to combine.

Cut the tuna into chunks and add to the vinaigrette.  Finally, add the scallions and red onions to the mixture.  Mix well.

Lightly toast the hot dog buns.  Place a layer of spinach leaves in the buns.  Pile the tuna mixture on top of the leaves.

Recipe adapted from Ina Garten.


Tuna Salad Roll
 
Print
Author: Feasts And Fotos
Ingredients
  • 1 pound sushi grade tuna steak, cut one inch thick
  • 2 tbsp olive oil, plus extra for brushing
  • 1 large lime, zested and juiced
  • 1 tsp wasabi powder
  • 1 tsp soy sauce
  • 1 tsp toasted seasame oil
  • 5 dashes tobasco sauce
  • 1 ripe Haas avocado
  • ¼ cup minced scallions
  • 2 tbsp red onion, finely chopped
  • Salt & pepper
  • Spinach leaves
  • Hot dog buns (top slit), lightly toasted
Method
  1. Brush steaks with olive oil and sprinkle with salt & pepper.  Place tuna steak in a very hot saute pan (or grill pan) and cook for only one minute on each side.  The center of the steaks should still be raw.  Set aside on a platter to cool.
  2. In a small bowl, combine the olive oil, lime zest, wasabi, lime juice, soy sauce and hot sauce along with a dash of salt & pepper.  Add the avocados to the vinaigrette and toss to combine.
  3. Cut the tuna into chunks and add to the vinaigrette.  Finally, add the scallions and red onions to the mixture.  Mix well.
  4. Lightly toast the hot dog buns.  Place a layer of spinach leaves in the buns.  Pile the tuna mixture on top of the leaves.
3.2.2802

Filed Under: Main Dishes, Salads Tagged With: roll, salad, spinach, tuna

Bulgar Salad With Broccoli

July 28, 2009 by Susan

BulgarSalad

This is one big bowl of healthy goodness.

Most people will recognize bulgar from tabbouleh, the middle eastern dish often eaten as an appetizer.  As it turns out, bulgar is much more nutritious than rice and couscous because it contains more fiber, vitamins and minerals.  Also, it has a better glycemic index than white rice or couscous.  I wanted to branch out from my current quinoa frenzy and give bulgar a try…and I’m happy I did.  It is very versatile, has a slightly chewy texture and a lovely nutty flavor.

I got the idea for this bulgar salad while flipping through some magazines in a bookstore.  For the life of me I can’t remember which magazine it was.  I liked the idea of the salad, however, I wanted to bulk it up a bit more so I thought to add steamed broccoli.  Anytime I can add broccoli to something, I go for it.  It’s common knowledge, for anyone that hasn’t been living under a rock, that broccoli is one of the most healthy, nutritious, anti-cancer foods available today.  It is one of the richest vegetable sources of calcium, iron and magnesium and is loaded with vitamins A and C and K.  The edamame, tomatoes and fresh herbs contribute to making this salad clean and wholesome.

This dish is quick to assemble, light and refreshing.  And at the risk of repeating myself, super healthy.  Every time I eat it I feel as if I’m taking a big scrub brush and cleaning my insides of anything harmful.

The salad is a terrific side dish for a piece of grilled chicken or fish.  It keeps well in the fridge for a few days and is great served at room temperature, or slightly cool from the fridge.  I like to drizzle some olive oil over the leftovers just before serving.

Here’s what you will need to serve 4 as a side dish….

Recipe

1 cup cooked bulgar (follow directions on bag)

2 cups cut up broccoli, steamed until tender but not too soft, cooled

1 pint grape tomatoes, cut in half lengthwise

1 cup frozen edamame, defrosted

1/2 cup scallions, chopped

2 tablespoons dill, chopped

1 cup parsley, chopped

1/4 cup mint, finely chopped

1/4 cup lemon juice

1/4 cup olive oil

1/8 tsp cayenne pepper

salt & pepper to taste

Method

Cook bulgar (boil in water, 2 to 1 ratio, simmer for 15 minutes).  Allow to cool.  Fluff and separate with a fork.

Steam broccoli, allow to cool.

In a large bowl add the broccoli, tomatoes, scallions, edamame, dill, parsley, mint and bulgar.  Stir to combine.  In a separate bowl whisk together the lemon juice, olive oil , cayenne pepper and salt (pepper is optional).  Pour over the bulgar salad and mix to incorporate.  The salad should just glisten with the dressing, it should not be soaked.

It’s as easy as that!


Bulgar Salad With Broccoli
 
Print
Author: Feasts And Fotos
Ingredients
  • 1 cup cooked bulgar (follow directions on bag)
  • 2 cups cut up broccoli, steamed until tender but not too soft, cooled
  • 1 pint grape tomatoes, cut in half lengthwise
  • 1 cup frozen edamame, defrosted
  • ½ cup scallions, chopped
  • 2 tablespoons dill, chopped
  • 1 cup parsley, chopped
  • ¼ cup mint, finely chopped
  • ¼ cup lemon juice
  • ¼ cup olive oil
  • ⅛ tsp cayenne pepper
  • salt & pepper to taste
Method
  1. Cook bulgar (boil in water, 2 to 1 ratio, simmer for 15 minutes).  Allow to cool.  Fluff and separate with a fork.
  2. Steam broccoli, allow to cool.
  3. In a large bowl add the broccoli, tomatoes, scallions, edamame, dill, parsley, mint and bulgar.  Stir to combine.  In a separate bowl whisk together the lemon juice, olive oil , cayenne pepper and salt (pepper is optional).  Pour over the bulgar salad and mix to incorporate.  The salad should just glisten with the dressing, it should not be soaked.
3.2.2802

Filed Under: Rice and Grains, Salads, Sides and Sauces Tagged With: broccoli, bulgar, edamame, healthy, lunch, side dish, tomatoes, vegetarian, wheat

Curried Egg Salad

June 1, 2009 by Susan

EggSaladBowl

I have become a big fan of hard boiled eggs of late.  I was never much into them, aside from eating a few on Easter.  I have recently discovered they are wonderful as a little snack to get me through until my next meal.

This new found interest of mine started me thinking…how about egg salad??  Again, never much of a fan.  If you’ve read my other post on chicken salad you will know I do not like super gloppy mayo mixtures – and that’s unfortunately how they come at most delis.  Also, egg salad is usually a bit on the boring side, right?

So, I set out to create a non-boring one.  I originally was leaning towards using paprika as the main spice, but I switched to curry – much more interesting.  The curry goes perfectly with the toasted almonds, a delicious combination.  I list 1/8 tsp of curry powder in the recipe.  This amount provides a nice curry flavor but if you are not afraid of curry feel free to use 1/4 tsp.  I usually find myself adding another pinch or so after the 1/8 tsp.

Of course this mixture needed a fresh green herb, I chose chives to provide another hint of onion flavor along with the shallots, as well as a shot of color.

This egg salad makes a great sandwich.  I use organic whole grain bread, toasted.  I like the contrast of the toasty bread with the smooth, soft egg salad.  Then, throw down a layer of baby spinach leaves, pile the eggs salad high on top and finish off with another piece of bread.  Another option…slather some on a toasted bagel in the morning for breakfast.  Terrific, either way.

Here’s what you will need to make 2–3 medium sized sandwiches…

Recipe

5 eggs

1 medium shallot, finely chopped

1/4 cup sliced almonds, toasted and cooled, roughly chopped

4 tsp chives

3 tbsp mayo

1 tsp mustard

1 tsp coarse mustard

1/8 tsp curry powder

whole grain bread, toasted

spinach leaves (optional)

salt & pepper to taste

Method

First task – hard boil your eggs.  This is a very important step!  Place the eggs in a sauce pan and cover with water by one inch.  Set over medium heat and bring to a slow, soft boil.  Turn off heat, cover and let sit for exactly 12 minutes.  Set your timer!  After the 12 minutes, drain the hot water, then run the eggs under cold water a few times, finally leaving cold water in the pot and allowing the eggs to sit for roughly 10-15 minutes.  Peel eggs.  Cut in half lenthwise and seperate whites from yolks.

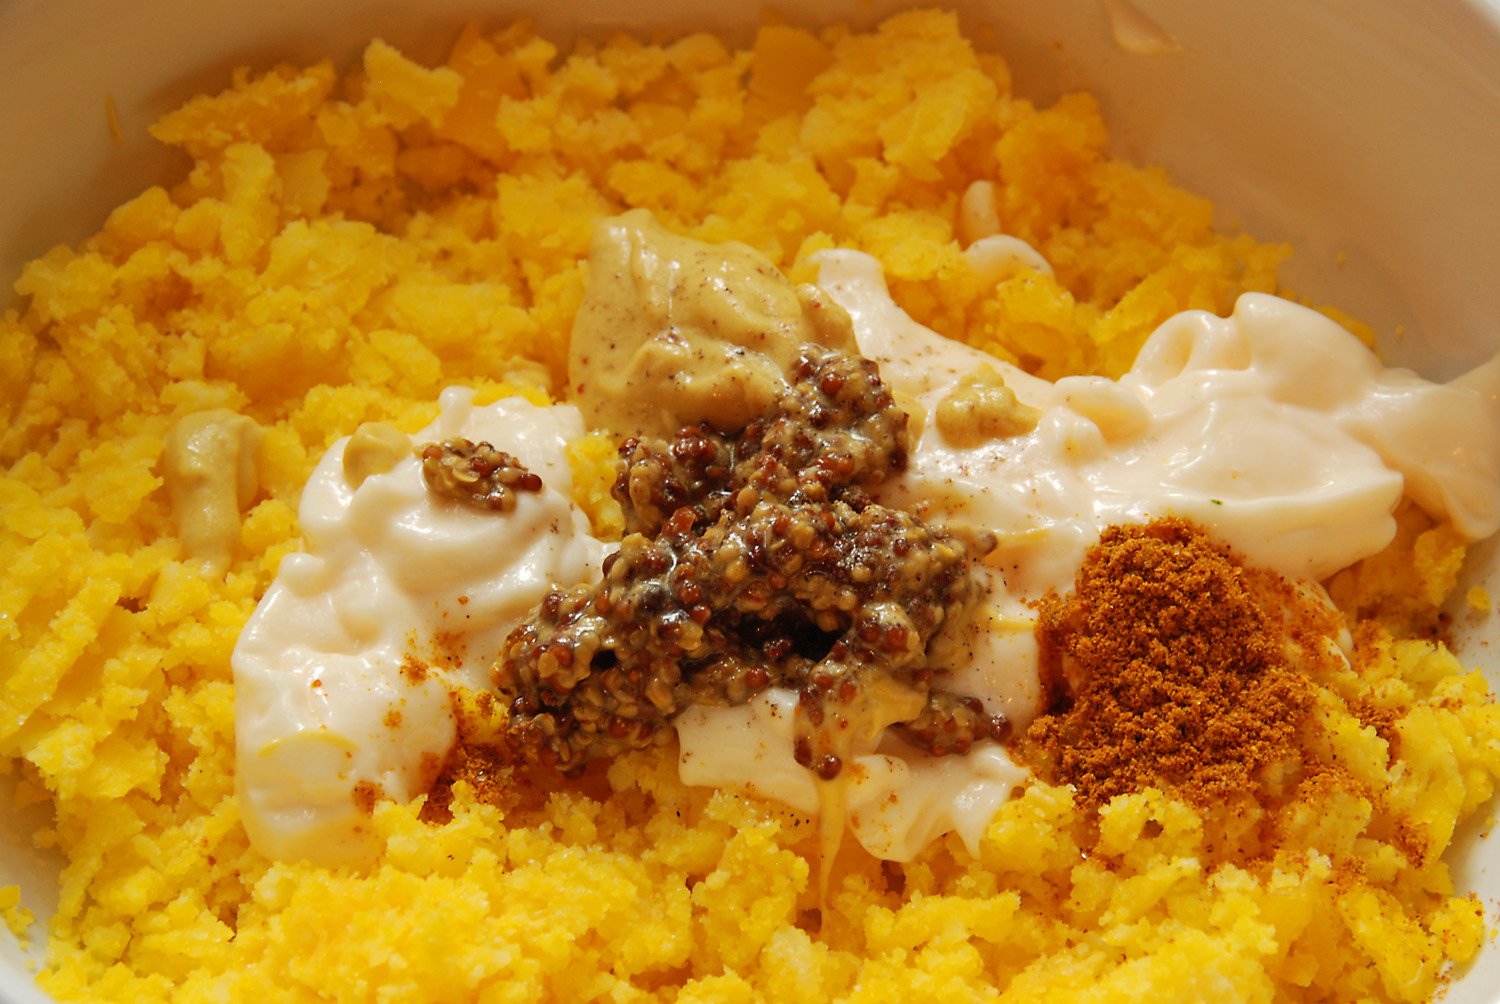
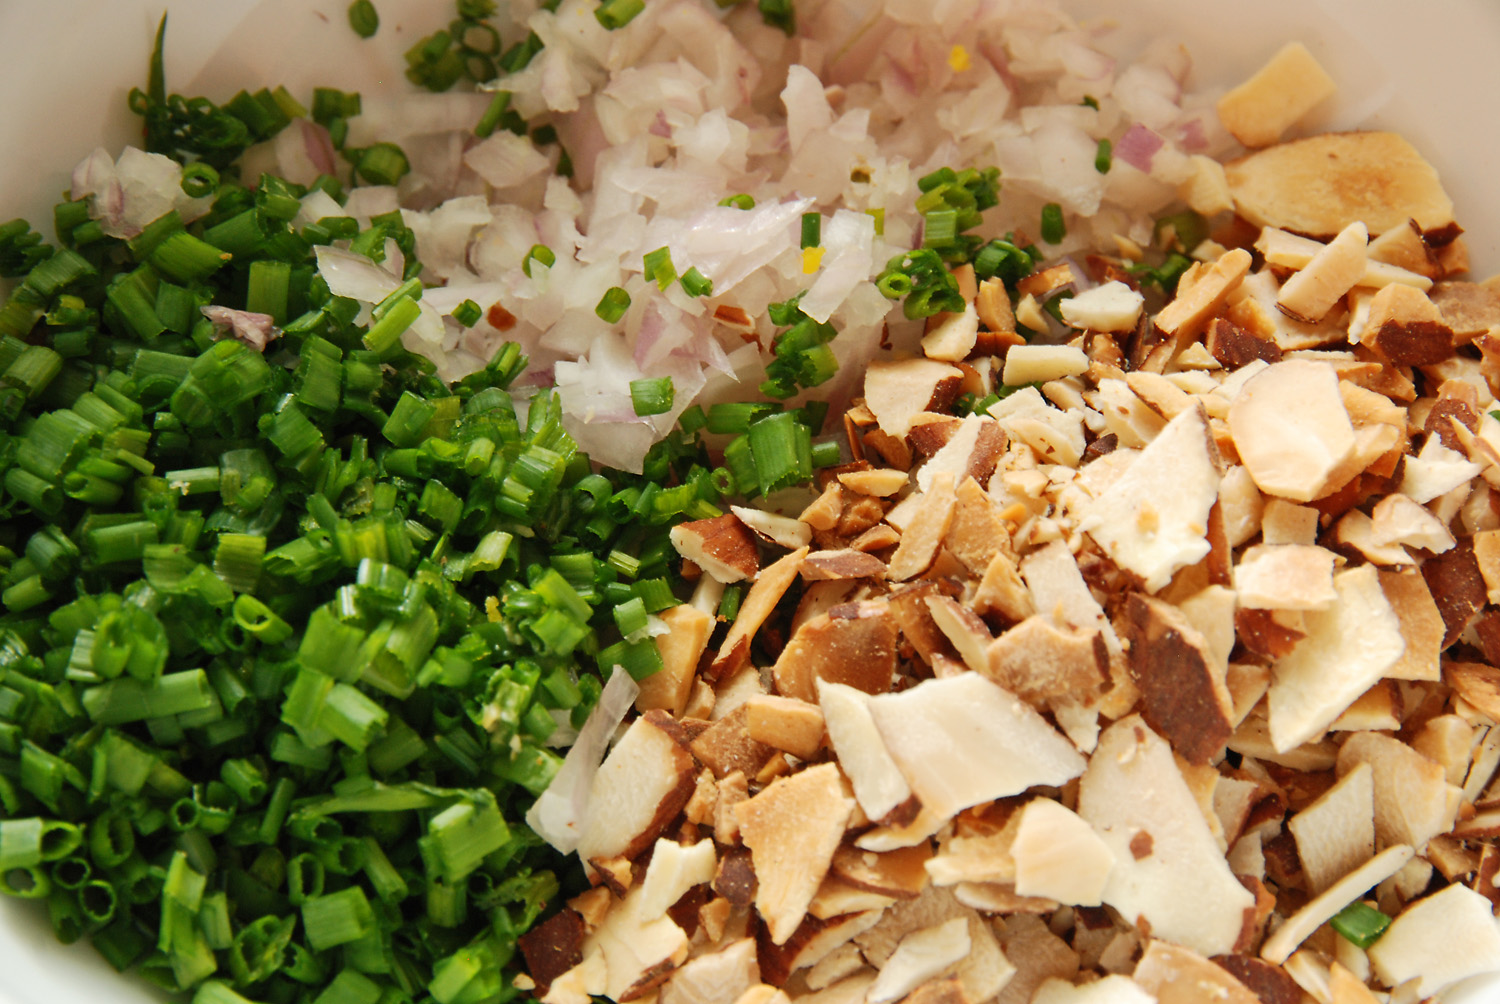
Put yolks in a bowl and mash with the back of a fork.  To the bowl add the mayo, both mustards, curry powder, shallots, chives and almonds.  Mix to combine well.

EggSaladIngredientsEggSaladIngredient2

Take the whites from two of the eggs and chop them with a knife.  I cut them into a small dice.  Then, with the back of a fork, gently mash the remaining egg whites, adding them to the bowl.  Mix everything together, adding salt & pepper to taste.   Assemble your sandwich and get eating!

Curried Egg Salad
 
Print
Author: Feasts And Fotos
Ingredients
  • 5 eggs
  • 1 medium shallot, finely chopped
  • ¼ cup sliced almonds, toasted and cooled, roughly chopped
  • 4 tsp chives
  • 3 tbsp mayo
  • 1 tsp mustard
  • 1 tsp coarse mustard
  • ⅛ tsp curry powder
  • whole grain bread, toasted
  • spinach leaves (optional)
  • salt & pepper to taste
Method
  1. First task - hard boil your eggs. This is a very important step! Place the eggs in a sauce pan and cover with water by one inch. Set over medium heat and bring to a slow, soft boil. Turn off heat, cover and let sit for exactly 12 minutes. Set your timer! After the 12 minutes, drain the hot water, then run the eggs under cold water a few times, finally leaving cold water in the pot and allowing the eggs to sit for roughly 10-15 minutes. Peel eggs. Cut in half lenthwise and seperate whites from yolks.
  2. Put yolks in a bowl and mash with the back of a fork. To the bowl add the mayo, both mustards, curry powder, shallots, chives and almonds. Mix to combine well.
  3. Take the whites from two of the eggs and chop them with a knife. I cut them into a small dice. Then, with the back of a fork, gently mash the remaining egg whites, adding them to the bowl. Mix everything together, adding salt & pepper to taste.
3.2.2802

Filed Under: Main Dishes, Salads Tagged With: almonds, chives, curry, egg, lunch, salad, sandwich

Chicken Salad

May 13, 2009 by Susan

ChickSaladFinalR

It’s always a challenge for me to figure out what to make for lunch.  Usually I’m having some type of leftover from the night before but when I have no leftovers in the fridge I’m stumped.

I was always turned off by tuna salads and chicken salads growing up for one main reason…excessive mayonnaise.  Can’t stand it.  I see the container of the stuff in the deli, want to give it another try, take the plunge and then end up hating it.  Thick gloppy mayo, ugh.  I’ve had luck in creating my favorite tuna fish sandwich ever, so I ventured out to try to create a chicken salad.

I love chicken.  Whenever possible I buy organic chicken and 9 times out of 10 I get the split chicken breasts on the bone with the skins on and bake them in the oven.  Perfection every single time.  Succulent.  Not exactly sure if the reason is because the chicken is organic or because of the way I’m baking it (or a combination of both).  Whatever the reason, I’m happy about it.

With all that said, I knew that would be how I would actually cook the chicken.  Then I set out to decide on the other ingredients, keeping flavor, texture and color in mind.  I finally decided on shredded carrots and chopped celery.  I always love the crunch and flavor of a nut, so I chose walnuts for this chicken salad.  And the herb….knew it had to be dill.  I love dill.

Now the serious stuff – the glue that holds it all together.  The component that will make or break the chicken salad.  I knew I could not tolerate thick mayo, so I tested out a few combinations of yogurt and mayo combined and finally arrived at a perfect combination.  You can use regular yogurt, but I prefer the consistency of Greek yogurt.

You might be thinking it is a bit strange to add yogurt to a chicken salad, but I’ll tell you, it works.  It is light and provides a great tang to the sandwich, pairing  wonderfully with the dill.   This yogurt mixture would also be great as a dip for cut up veggies.

I love this chicken salad so much, I find I’m making it once a week.  I make extra and keep it in the fridge (it lasts for a few days).  It’s delicious in between two slices of hearty, whole grain bread…equally delicious eaten by the spoonful right out of the container.

Here’s what you will need to make approximately 3 medium sandwiches…

Recipe

2 large split chicken breasts, bone in, skin on

2 tsp chopped dill

1/2 cup chopped celery

1 medium carrot, shredded (1/2 cup)

1/3 cup chopped walnuts, toasted

1/3 cup plain Greek yogurt

1 tbsp mayo

2 tbsp chopped dill

small squeeze of lemon juice

salt & pepper

olive oil

your favorite bread

Method

Preheat oven to 350 degrees.  Put chicken breasts in a baking dish, sprinkle with olive oil, salt & pepper and bake in the oven for 35-45 minutes or until skin is lightly browned and juices run clear.  Allow to cool.

Meanwhile, add the shredded carrot and chopped celery to a large bowl with 2 tsp of dill and the toasted walnuts.  Mix well.  Set aside.

In a small bowl combine the Greek yogurt, mayo, 2 tbsp chopped dill and lemon juice.  Mix well.  Add salt & pepper to taste.

Once the chicken has cooled enough to handle, remove the skin and pull all the meat off the bone.  Cut into medium sized cubes and place into a separate bowl.  Allow chicken to sit for a few minutes to cool off completely.  Drain any excess chicken juice from bowl.  (Draining the juice is an important step, this will eliminate the yogurt dressing from getting too watery).

Add cubed chicken into the bowl with the carrot and celery mixture.  Mix well.  Add the yogurt mixture to the chicken until it reaches the desired consistency.  I usually add half the mixture first, then mix.  I add the remaining yogurt a spoonful at a time so it doesn’t get too creamy.

Place a few mounds in between slices of your favorite bread and enjoy!


Chicken Salad
 
Print
Author: Feasts And Fotos
Ingredients
  • 2 large split chicken breasts, bone in, skin on
  • 2 tsp chopped dill
  • ½ cup chopped celery
  • 1 medium carrot, shredded (1/2 cup)
  • ⅓ cup chopped walnuts, toasted
  • ⅓ cup plain Greek yogurt
  • 1 tbsp mayo
  • 2 tbsp chopped dill
  • small squeeze of lemon juice
  • salt & pepper
  • olive oil
  • your favorite bread
Method
  1. Preheat oven to 350 degrees.  Put chicken breasts in a baking dish, sprinkle with olive oil, salt & pepper and bake in the oven for 35-45 minutes or until skin is lightly browned and juices run clear.  Allow to cool.
  2. Meanwhile, add the shredded carrot and chopped celery to a large bowl with 2 tsp of dill and the toasted walnuts.  Mix well.  Set aside.
  3. In a small bowl combine the Greek yogurt, mayo, 2 tbsp chopped dill and lemon juice.  Mix well.  Add salt & pepper to taste.
3.2.2802

Filed Under: Salads, Uncategorized Tagged With: carrot, celery, chicken, dill, lunch, salad, walnut, yogurt

Beet Panzanella

March 31, 2009 by Susan

beetpanzanellaresize

I can hardly believe I am writing a food post about a salad.  I like salads, but I’ve never been a real lover of them, I can take ’em or leave ’em, if you know what I mean.  I was, however, so impressed with this salad that I had to post the recipe.  It is outstanding.

Panzanella is a bread salad and I make a delicious one in the spring/summer.  When I came across this ‘winter’ version, I was intrigued to give it a try.  The contrasting flavors really round out this salad, which truthfully can be a meal all on it’s own.  It’s sweet, savory, creamy and crunchy all at the same time and after making my own croutons I will never again buy them in a store.

The individual parts of this salad can be made ahead and stored separately, lasting well in the fridge for a few days.  If you have been reading my blog for any length of time, you know how much I love that!  This salad is slightly time consuming to make so getting several ‘uses’ out of it is a terrific payoff.  I keep the croutons in a separate zip lock bag in the fridge and they last a long time.  The beets and shallots are put in a different zip lock back, the dressing in a container…well, you get the idea.   Just assemble as needed.

Some advice regarding this salad that I must pass on.  The first is do not wear something white or of extreme value when making this salad.  The beets stain like nobody’s business.  The second is do not assemble this too far ahead of time, the croutons will get soggy and that is just not good.  The bread must be crunchy.  I would say you can let the salad sit for about 10-15 minutes before any soggy problems start.

I’ve adapted this recipe from Tyler Florence, making just a few small changes.  My version is below…

Recipe

2 bunches baby beets (or large beets cut into chunks)

4 shallots, peeled

Extra-virgin olive oil

2 sprigs thyme and oregano

4 slices pancetta, sliced into small pieces

1 log goat cheese, refrigerated

1 loaf whole wheat bread, cut into crouton-sized pieces

1/2 lemon, juiced

1/4 cup honey

2 tablespoons balsamic vinegar

1/2 orange, juiced

1 handful dates, chopped

1 large handful arugula

Salt & pepper to taste

Method

Preheat the oven to 350 degrees F.

Wash beets well, cut into chunks, then place on a long sheet of aluminum foil. Split shallots lengthwise and add to foil. Drizzle with extra virgin olive oil, thyme, and oregano leaves and season with salt and pepper. Fold foil into a packet and roast in oven until fork tender and nicely caramelized, about 40 – 50 minutes.

In saute pan, cook pancetta until crisp.

Toss the bread cubes with 1⁄4 cup oil until the bread is damp with the oil. Spread the bread on a baking sheet and bake until the bread begins to brown, about 10 minutes.

While the bread is baking, make the dressing. In a large mixing bowl, add the honey, lemon juice, orange juice, balsamic vinegar, 4 tablespoons oil, salt, pepper, and stir together. Add all the remaining ingredients except arugula and gently stir. Taste for seasoning. Remove beets and bread from oven and add to bowl. Stir together and season with salt and pepper. Add pancetta and arugula.  Divide onto individual plates and enjoy!


Beet Panzanella
 
Print
Author: Feasts And Fotos
Ingredients
  • 2 bunches baby beets (or large beets cut into chunks)
  • 4 shallots, peeled
  • Extra-virgin olive oil
  • 2 sprigs thyme and oregano
  • 4 slices pancetta, sliced into small pieces
  • 1 log goat cheese, refrigerated
  • 1 loaf whole wheat bread, cut into crouton-sized pieces
  • ½ lemon, juiced
  • ¼ cup honey
  • 2 tablespoons balsamic vinegar
  • ½ orange, juiced
  • 1 handful dates, chopped
  • 1 large handful arugula
  • Salt & pepper to taste
Method
  1. Preheat the oven to 350 degrees F.
  2. Wash beets well, cut into chunks, then place on a long sheet of aluminum foil. Split shallots lengthwise and add to foil. Drizzle with extra virgin olive oil, thyme, and oregano leaves and season with salt and pepper. Fold foil into a packet and roast in oven until fork tender and nicely caramelized, about 40 - 50 minutes.
  3. In saute pan, cook pancetta until crisp.
  4. Toss the bread cubes with 1⁄4 cup oil until the bread is damp with the oil. Spread the bread on a baking sheet and bake until the bread begins to brown, about 10 minutes.
  5. While the bread is baking, make the dressing. In a large mixing bowl, add the honey, lemon juice, orange juice, balsamic vinegar, 4 tablespoons oil, salt, pepper, and stir together. Add all the remaining ingredients except arugula and gently stir. Taste for seasoning. Remove beets and bread from oven and add to bowl. Stir together and season with salt and pepper. Add pancetta and arugula.
3.2.2802

Filed Under: Salads Tagged With: beet, croutons, goat cheese, panzanella, salad

  • 1
  • 2
  • Next Page »
Hello and welcome to Feasts and Fotos!

Archives

Categories

Copyright © 2025 · Foodie Pro Theme by Shay Bocks · Built on the Genesis Framework · Powered by WordPress